Everett Janne, Extension Landscape Horticulturist (deceased)
Proper pruning enhances the beauty of almost any landscape tree and shrub, while improper pruning can ruin or greatly reduce its landscape potential. In most cases, it is better not to prune than to do it incorrectly. In nature, plants go years with little or no pruning, but man can ruin what nature has created. By using improper pruning methods healthy plants are often weakened or deformed. In nature, every plant eventually is pruned in some manner. It may be a simple matter of low branches being shaded by higher ones resulting in the formation of a collar around the base of the branch restricting the flow of moisture and nutrients. Eventually the leaves wither and die and the branch then drops off in a high wind or storm. Often, tender new branches of small plants are broken off by wild animals in their quest for food. In the long run, a plant growing naturally assumes the shape that allows it to make the best use of light in a given location and climate. All one needs to do to appreciate a plant’s ability to adapt itself to a location is to walk into a wilderness and see the beauty of natural growing plants.
Pruning, like any other skill, requires knowing what you are doing to achieve success. The old idea that anyone with a chain saw or a pruning saw can be a landscape pruner is far from the truth. More trees are killed or ruined each year from improper pruning than by pests. Remember that pruning is the removal or reduction of certain plant parts that are not required, that are no longer effective, or that are of no use to the plant. It is done to supply additional energy for the development of flowers, fruits, and limbs that remain on the plant. Pruning, which has several definitions, essentially involves removing plant parts to improve the health, landscape effect, or value of the plant. Once the objectives are determined and a few basic principles understood, pruning primarily is a matter of common sense.
The necessity for pruning can be reduced or eliminated by selecting the proper plant for the location. Plants that might grow too large for the site, are not entirely hardy, or become unsightly with age should be used wisely and kept to a minimum in the landscape plan. Advances in plant breeding and selection in the nursery industry provide a wide assortment of plants requiring little or no pruning. However, even the most suitable landscape plants often require some pruning. The guidelines presented in this publication should be helpful when pruning any plant.
Reasons for Pruning
- to train the plant
- to maintain plant health
- to improve the quality of flowers, fruit, foliage or stems
- to restrict growth
Definitions of Terms
- Broad-leaved evergreen
- —an evergreen plant with broad leaves that are not needle-shaped.
- Caliper
- —refers to the diameter of a tree. In nursery-landscape practice, caliper is measured 6 inches above the ground level up to and including 4-inch diameter size and 12 inches above the ground level for larger sizes.
- Candle
- —refers to early spring growth of pine shoots before needle expansion.
- Central leader
- —the main stem of the tree from which other branches develop. In most cases, it is the trunk.
- Crotch
- —the angle developed between two connecting branches.
- Deciduous
- —plants that normally have leaves only during the growing season and lose their leaves during the dormant season.
- Dieback
- —the dying back of stems due to adverse weather conditions, insects, diseases or other causes.
- Dormant
- —the period of the year when a plant is not growing.
- Espalier
- —to train a plant on a wire or trellis against a wall or other support.
- Lateral
- —a branch originating from the main trunk.
- Multiple stemmed plants
- —plants with more than one stem form the base compared to plants with only a central leader.
- Narrow-leaved evergreen
- —an evergreen plant with leaves that are needle-shaped.
- Permanent branch
- —a branch that is part of the major growth habit of the tree, usually originating from the trunk.
- Radial branch spacing
- —the distribution of branches around the trunk of a tree.
- Scaffold branching
- —a permanent branch originating from the trunk and becoming a part of the major branching or framework of the tree.
- Shearing
- —cutting back plants with hedge shears resulting in a very formal growth habit. Limit shearing to hedges, topiary or where a formal garden is to be maintained.
- Sucker
- —a vigorous shoot originating from root or stem tissue below ground.
- Temporary branch
- —a branch usually originating from the trunk that is removed by pruning after permanent branches have been selected.
- Terminal
- —tip ends of branches.
- Thinning
- —removal of connecting branches to point of origin or shortening the length of a branch by cutting to a lateral.
- Training
- —to dictate the development and growth of a plant by physical means, such as pruning.
- Vertical branch spacing
- —distribution of branches up and down the trunk of a tree.
- Water sprout
- —vigorous shoot arising from the trunk or older branches.
- Wound
- —area where the bark of a plant is cut or damaged.
- Wound dressing
- — a specially formulated material often called pruning paint, which is applied to tree wounds.
Plan Approach to Pruning
Pruning should follow a definite plan. Consider the reason or purpose before cutting begins.
By making the pruning cuts in a certain order, the total number of cuts is reduced greatly. The skilled pruner first removes all dead, broken, diseased or problem limbs by cutting them at the point of origin or back to a strong lateral branch or shoot. Often, removing this material opens the canopy sufficiently so that no further pruning is necessary.
The next step in pruning is to make any training cuts needed. By cutting back lateral branches, the tree or shrub is trained to develop a desired shape, to fill in an open area caused by storm or wind damage or to keep it in bounds to fit a given area. To properly train a plant, one should understand its natural growth habit. Always avoid destroying the natural shape or growth habit when pruning unless maintaining a close watch over the plant, for after a period of time it attempts to assume the more natural growth habit.
Make additional corrective prunings to eliminate weak or narrow crotches and remove the less desirable central leader where double leaders occur. After these cuts have been made, stand back and take a look at your work. Are there any other corrective pruning cuts necessary? If the amount of wood removed is considerable, further pruning may need to be delayed a year or so. Remove water sprouts unless needed to fill a hole or to shade a large limb until other branches develop.
When to Prune
Pruning can actually be done at any time of the year; however, recommended times vary with different plants. Contrary to popular belief, pruning at the wrong time of the year does not kill plants, but continual improper pruning results in damaged or weakened plants. Do not prune at the convenience of the pruner, but rather when it results in the least damage to the plant. There is little chance of damaging the plant if this rule is followed. In general, the best time to prune most plants is during late winter or early spring before growth begins. There are exceptions to this rule, and they will be noted under the discussion of the specific plant groups. The least desirable time is immediately after new growth develops in the spring. A great amount of food stored in roots and stems is used in developing new growth. This food should be replaced by new foliage before it is removed; if not, considerable dwarfing of the plant may occur. This is a common problem encountered in pruning.
It also is advisable to limit the amount of pruning done late in summer as new growth may be encouraged on some plants. This growth may not have sufficient time to harden off before cold weather arrives resulting in cold damage or winter kill. Prune plants damaged by storms or vandalism or ones with dead limbs as soon as possible to avoid additional insect and disease problems that may develop.
Pruning Equipment
To know and practice the rules of pruning is most important, but of equal importance is using the correct tools. Equipment can be limited to a few items if the proper ones are selected. Select tools that will do the job, keep a sharp edge, and are relatively easy to sharpen and handle. Some of the most commonly used pruning tools are shown in this section. Good equipment properly cared for does a better job and lasts longer. Store equipment in a dry room, keep it sharp and in good operating condition. When pruning diseased plants, disinfect all shears and saw blades after each cut to prevent spreading disease to healthy plants. An example of this is pruning fire blight from pears, pyracantha or cotoneaster. Use alcohol or bleach to disinfect equipment between each cut when pruning diseased plants. Mix at the rate of one part bleach to nine parts water. At the end of the day, oil the pruning equipment well to avoid rusting.
There are many kinds of hand pruning shears. Most of them are designed for cutting stems up to 1/2 inch in diameter. Attempting to cut larger branches risks making a poor cut and/or ruining the shears.
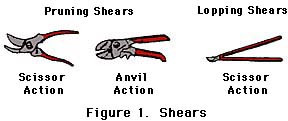
Two common styles of hand shears are the scissor action and the anvil cut. In scissor action shears, a thin, sharp blade slides closely past a thicker but also sharp blade. These usually cost more but make cleaner, closer cuts. In anvil cut shears, a sharpened blade cuts against a broad, flat blade.
Lopping shears (loppers) have long handles that are operated by both hands (Figure 1). Even the least expensive can cut material 1/2 inch in diameter. Better ones can slice through branches of 2 inches or more, depending on species (i.e. oak is tougher than ash) and condition (i.e., dead wood is tougher than live wood until decay sets in).
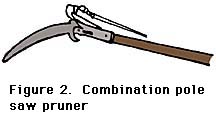
Pole pruners usually have a cutter with one hooked blade above and a cutting blade beneath, similar to a large pair of lopping shears. The cutter is on a pole and is operated by pulling a rope downward. Poles can be made of several materials and can either be in sections that fit together or that telescope. Wooden poles are sturdy but heavy, while aluminum poles are light but can conduct electricity if they touch an overhead electrical wire. Fiberglass or some type of plastic compound is probably the best pole material. Poles can be fitted with saws, but these are usually very frustrating to use (Figure 2).
Use of pole pruners can be dangerous. Material cut overhead can fall on the operator (unless it hangs up in other branches). The user should exercise caution and wear head and eye protection.
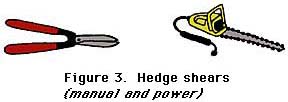
Hedge shears are used mainly for shearing plants into hedges or formal shapes. The most common type is manually operated; however, if large areas of hedges are involved, power-driven shears may be more practical (Figure 3). Pruning saws, both rigid or folding, are very useful for cutting larger branches that are too large for hand shears. Tree saws are available for removing large tree branches. Pruning saws, which usually cut on the pull stroke, are preferred over a carpenter’s saw because they cut faster and easier. The teeth in these saws are set for a wider cut allowing the sawdust to kick out resulting in less binding in green wood. Bow saws are good only where no obstructions exist for a foot or more above the area to be cut (Figure 4).

Gas powered and electrical chain saws come in a variety of sizes. They are best suited for removing trees and cutting firewood, but can also be used to prune live plant material. Only professional arborists should use power saws for pruning up in trees because of safety concerns.
Other tools, which are sometimes necessary, are chisels, gouges, pruning knives and mallets. These all come in handy when repairing storm damage wounds or other wounds.
Care of Tools
Clean and oil tools regularly, including wiping an oily cloth on blades and other metal surfaces. Keep cutting edges sharp; several passes with a good oil stone will usually suffice. Paint, varnish or regularly treat wooden handles with linseed oil. Use tools properly. Don’t twist or strain pruners or loppers. Keep the branch to be cut as deeply in the jaws and near the pivot as possible. Don’t cut wires with pruning tools.
Wound Dressing
Much has been written about the advantages and disadvantages of using a wound dressing on large cuts. Traditionally, wound dressing or pruning paint is used only on cuts larger than an inch in diameter. However, scientists have found that wound dressings are strictly cosmetic and have little to do with preventing insect or disease damage to the wound area. Pruning paint may, in fact, slow down the healing process. In general, wound dressings are not recommended or necessary, with one exception. On oak trees in areas of Texas where the oak wilt disease is prevalent, wound dressing should be used to help prevent the bark beetle from spreading the disease through the pruned surface on a tree.
Making Pruning Cuts Correctly
To encourage rapid healing of wounds, make all cuts clean and smooth. This requires good, sharp pruning equipment. Do not leave stubs since they are usually where die back occurs. Avoid tearing the bark when removing large branches. The following provides some specifics on pruning techniques.
Most woody plants fall into two categories based on the arrangement of the buds on the twigs and branches. In general, the bud arrangements determine the plants’s typical growth habit. Buds may have an alternate or an opposite arrangement on the twigs. A plant with alternate buds usually is rounded, pyramidal, inverted pyramidal, or columnar in shape. Plants having opposite buds rarely assume any form other than that of a rounded tree or shrub with a rounded crown. The position of the last pair of buds always determines the direction in which the new shoot will grow. Buds on top of the twig probably will grow upward at an angle and to the side on which it is directed. In most instances, it is advisable to cut back each stem to a bud or branch. Selected buds that point to the outside of the plant are more desirable than buds pointing to the inside. By cutting to an outside bud, the new shoots will not grow through the interior of the plants or crisscross.
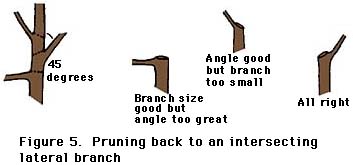
When cutting back to an intersecting (lateral) branch, choose a branch that forms an angle of no more than 45 degrees with the branch to be removed (Figure 5). Also, the branch that you cut back to should have a diameter of at least half that of the branch to be removed. Make slanting cuts when removing limbs that grow upward; this prevents water from collecting in the cut and expedites healing.
To “open” a woody plant, prune out some of the center growth and cut back terminals to the buds that point outward. In shortening a branch or twig, cut it back to a side branch and make the cut 1/2 inch above the bud. If the cut is too close to the bud, the bud usually dies. If the cut is too far from the bud, the wood above the bud usually dies, causing dead tips on the end of the branches. When the pruning cut is made, the bud or buds nearest to the cut usually produce the new growing point. When a terminal is removed, the nearest side buds grow much more than they normally would, and the bud nearest the pruning cut becomes the new terminal. If more side branching is desired, remove the tips of all limbs. The strength and vigor of the new shoot is often directly proportioned to the amount that the stem is pruned back since the roots are not reduced. For example, if the deciduous shrub is pruned to 1 foot from the ground, the new growth will be vigorous with few flowers the first year. However, if only the tips of the old growth are removed, most of the previous branches are still there and new growth is shorter and less vigorous. Flowers will be more plentiful although smaller. Thus, if a larger number of small flowers and fruits are desired, prune lightly. If fewer but high quality blooms or fruits are wanted in succeeding years, prune extensively.
Thick, Heavy Branches
According to Dr. Alex Shigo, former USDA Forest Service plant pathologist, thick and heavy branches should be removed flush to the collar at the base of the branch, not flush with the trunk (Figure 6). The collar is an area of tissue containing a chemically protective zone. In the natural decay of a dead branch, when the decay advancing downward meets the internal protected zone, with an area of very strong wood meets an area of very weak wood. The branch then falls away at this point, leaving a small zone of decayed wood within the collar. The decay is walled off in the collar. This is the natural shedding process when all goes according to nature’s plan. When the collar is removed, the protective zone is removed, causing a serious trunk wound. Wood-decay fungi can then easily infect the trunk. If the pruned branch is living, removing the collar at the base still causes injury.
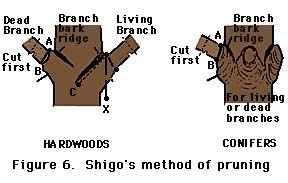
When cutting branches more than 1 1/2 inches in diameter, use a three-part cut. The first step is to saw an undercut from the bottom of the branch about 6 to 12 inches out of the trunk and about one third of the way through the branch. Make a second cut from the top, about 3 inches further from the undercut, until the branch falls away. The resulting stub can then be cut back to the collar of the branch. If there is danger of the branch damaging other limbs or objects on the ground, it should be properly roped and supported, then carefully lowered to the ground.
Topping Versus Thinning
All too often trees are topped (“dehorned”) to reduce size or to rejuvenate growth. In either case topping is not a recommended practice; in fact, some refer to it as the “Texas chain saw massacre”. Topping is the process whereby a tree is cut back to a few large branches. After 2 to 3 months, regrowth on a topped tree is vigorous, bushy and upright. Topping seriously affects the tree’s structure and appearance. The weakly attached regrowth can break off during severe wind or rain storms. Topping may also shorten the life of a tree by making it susceptible to attack by insect and disease.
Thinning is a better means of reducing the size of a tree or rejuvenating growth. In contrast to topping, thinning removes unwanted branches by cutting them back to their point of origin. Thinning conforms to the tree’s natural branching habit and results in a more open tree, emphasizing the branches’ internal structure. Thinning also strengthens the tree by forcing diameter growth of the remaining branches.
Training Young Trees
Young trees can be trained using pruning techniques which will help promote plant health and long life.
The first pruning after trees and shrubs are purchased consists of removing broken, crossing and pest-infested branches. The traditional recommendation of pruning up to one-third of top growth when transplanting to compensate for root loss is no longer valid, according to recent research. Excessive pruning at transplanting reduces leaf area, which decreases the amount of plant energy generated which are needed to create a healthy root system. When transplanting woody plants, the only necessary pruning is the removal of broken or damaged branches.
The central leader of a tree should not be pruned unless the leader is not wanted, as is the case with some naturally low-branched trees or where multiple-stemmed plants are desired. Trees with a central leader, such as Texas red oak, sweet gum or magnolia, may need little or no pruning except to eliminate branches competing with the central leader. These competing branches should be shortened. Some pruning may be necessary to maintain desired shape and to shorten extra vigorous shoots.
The height of the lowest branch can range from a few inches above the ground for screening or windbreaks, to more than 7 feet above the ground near a street or patio. Removal of lower limbs is usually done over a period of years beginning in the nursery and continuing for several years after transplanting until the desired height is reached.
The concept in training a tree called “the trashy trunk” refers to this gradual raising of the lowest branches of a tree. Lower branches on the main trunk help create a thicker trunk more quickly. A common mistake in pruning young trees is to strip them of small branches leaving only a tuft of leaves at the top of the tree. This training is incorrect and forms a weak “buggy whip” trunk. Remove lower limbs when they reach 1 inch in diameter. This prevents permanent scarring of the trunk caused by removing larger limbs.
Another important concept in training trees is light versus heavy cuts. This refers to the length of the branch being removed and the desired growth response of that branch. On a young, vigorously growing branch, if the terminal end is lightly cut back (less than 6 inches), then lateral branching is induced up and down the branch. On the contrary, if this branch is heavily cut back (from 6 inches to several feet), the one or two buds located just below the cut are forced and grow at a very rapid rate. The importance of this pruning concept lies in the development of bushy, well-shaped trees through light pruning and the often-desired invigorating effect of heavy cuts.
For greater strength, branches selected for permanent scaffolds must have a wide angle of attachment to the trunk. Branch angles less than 30 degrees from the main trunk result in a very high percentage of breakage, while those between 60 and 70 degrees have a very low breakage rate.
Vertical branch spacing and radial branch distribution are important (Figure 7). If this has not been done in the nursery, start it at transplanting.
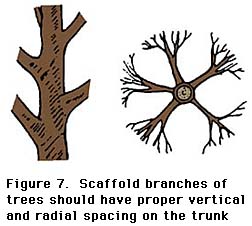
Major scaffold branches of shade trees should be vertically spaced at least 8 inches apart and preferably 20 to 24 inches apart. Closely spaced scaffolds have fewer lateral branches resulting in long, thin branches with poor structural strength.
Radial branch distribution should allow five to seven scaffolds to fill the circle of space around a trunk. Radial spacing prevents one limb from overshadowing another, which in turn reduces competition for light and nutrients. Remove or prune shoots that are too low, too close or too vigorous in relation to the leader and to selected scaffold branches.
Pruning Mature Trees
The home gardener should limit pruning of mature trees to smaller branches that can be reached from the ground. Leave the trimming of large branches and work off the ground to professional arborists who are skilled climbers and have proper equipment and insurance. Trees generally require less pruning than other ornamentals in the landscape but may occasionally need corrective pruning to maintain health and vigor. Mature trees are generally pruned only for sanitation, safety or to restrict size. Trees are best pruned during the dormant season. This is especially true for oaks to help prevent the spread of oak wilt.
An experienced tree professional can easily distinguish between live and dead wood in winter. Winter pruning is often preferred because it is easy to visualize shaping when foliage is gone. Such work can also be done at a lower cost in winter because fewer precautions are necessary to avoid garden and flower bed damage and cleanup is easier.
Repairing Tree Injury
Injuries to trees that expose the wood or kill the bark may allow insects or disease organisms to enter the tree. Proper treatment protects the tree and promotes faster healing. Few trees reach maturity without receiving one or more wounds from a variety of sources. Yet trees have survived for centuries to become the oldest living creatures on earth despite wounding. Some recent work has involved dissecting trees in an effort to understand how they compartmentalize and close an injury. Trees do not heal in the true sense of the word. Injured tree tissue is never repaired and returned to the former state as is a cut on a person’s hand. Trees react by closing the wound and compartmentalizing or isolating the injured tissue from the surrounding tissue. During compartmentalization enclosure, contents from the injured cells leak onto the uninjured surface where they oxidize and form a barrier to prevent further infection. Then the most recently laid down wood is altered as is the tissue around the injury. This is accompanied by discoloration, the extent of which depends on the kind of tree, the vigor, kind of wound, location of the wound and the time of wounding. New growth rings are laid down the following spring and new tissue begins to grow over the injured tissue. Over a period of time, the new tissue closes the wound.
Homeowners can help the plant compartmentalize the damage more rapidly than it does in nature. If bark has been crushed or stripped from the trunk, remove the injured bark, shape the wound. Cut away all damaged bark and remove isolated scraps from the wound area. For fastest healing, shape the edge of the wound, as nearly as possible, to an elongated ellipse. If this shape cannot be obtained, shape the top and bottom of the wounded area so they come to a point, even if the wound must be enlarged slightly. Remove all splintered wood and smooth the surface of the exposed area with a chisel.
Some true injuries result in cavities or hollows within the main trunk or large branch of a tree. For many years gardeners have tried to fill these cavities with bricks, concrete and other materials in an effort to seal the cavity from rain, insects and diseases. Armed with the knowledge of the plant’s ability to compartmentalize any wound it is not recommended to fill tree cavities. If water does not drain easily out of the cavity, many arborists will recommend trimming the cavity opening so that water can drain out. If this is not possible, a weep hole may be drilled into the bottom of the cavity to allow water to drain freely. Other than these actions, simply keeping the cavity clean of debris and leaves is all that is recommended.
For a year or more after a tree has been struck by lightning, it is often difficult to determine the extent of damage since much of the injury may be internal. Trees that seem badly damaged may live while others apparently only mildly injured may die. If the tree can be saved, remove all shattered parts and damaged limbs; then smooth and paint exposed wood.
In storm-damaged trees, remove all broken branches and reshape the tree as well as possible at the particular time. Try to encourage new branch development in areas with broken branches. Broken trunks, split crotches or cracked limbs often are mended by restoring the damaged part to its original position and holding it there permanently. Consult professional arborists to install screw rods or cables in trees where this work is necessary.
Pruning Shrubs
Deciduous and Flower Shrubs
Pruning recommendations for most deciduous shrubs consist of thinning out, gradual renewal and rejuvenation pruning. In thinning out, a branch or twig is cut off at its point of origin from either the parent stem or ground level (Figure 8).
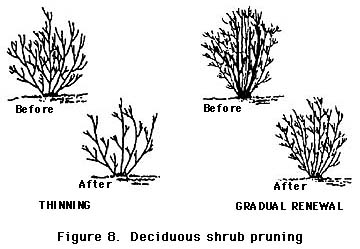
This pruning method results in a more open plant; it does not stimulate excessive new growth, but does allow room for growth of side branches. Considerable growth can be cut off without changing the plant’s natural appearance or growth habit. Plants can be maintained at a given height and width for years by thinning out. This method is best done with hand pruning shears, loppers or a saw, but not with hedge shears. Thin out the oldest and tallest stems first.
In gradual renewal pruning, a few of the oldest and tallest branches are removed at or slightly above ground level on an annual basis (Figure 8). Some thinning may be necessary to shorten long branches or maintain a symmetrical shape.
To rejuvenate an old, overgrown shrub, remove one-third of the oldest, tallest branches at or slightly above ground level before new growth starts.
The general pruning procedure shown for crape myrtle (Figure 9), applies to many large shrubs and small tree species.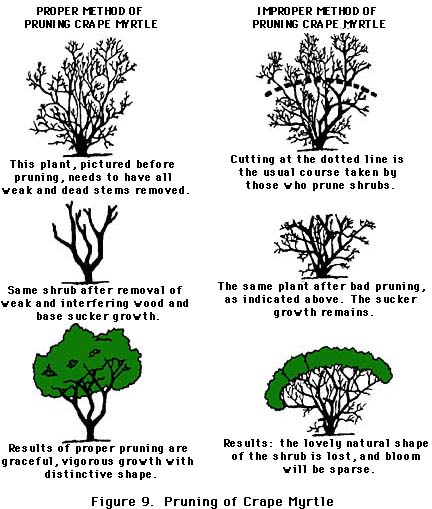
If a shrub is grown for its flowers, time the pruning to minimize disruption of blooming. Spring flowering shrubs bloom on last season’s growth and should be pruned soon after they bloom. This allows for vigorous summertime growth and results in plenty of flower buds the following year.
| Scientific name | Common name |
|---|---|
| Cercis canadensis | Redbud |
| Chaenomeles japonica | Japanese quince |
| Chionanthus virginicus | Fringe Tree |
| Forsythia spp. | All forsythia species |
| Lonicera spp. | Honeysuckle |
| Rapheolepis indica | Indian hawthorn |
| Rhododendron spp. | Azaleas and rhododendrons |
| Rosa spp. | Some climbing and rambling rose species |
| Spiraea spp. | Early white spirea species |
| Viburnum spp. | Viburnum species |
Some shrubs that bloom after spring usually do so from buds which are formed on shoots that grow the same spring. These shrubs should be pruned in later winter to promote vigorous shoot growth in spring.
| Scientific name | Common name |
|---|---|
| Abelia X. grandiflora | Glossy abelia |
| Buddleia davidii or B. globose | Butterfly bush |
| Hibiscus syriacus | Shrub althea |
| Hydrangea arborescens | Hills of Snow |
| Hypericum spp. | St. Johnsworlth |
| Lagerstroemia indica | Crape myrtle |
| Rosa spp. | Most shrub rose species and varieties |
| Vitex agnus-castus | Chaste tree |
Pruning Narrow-Leaved Evergreens
Since narrow-leaved evergreens produce new growth in spring and fall and do not grow much in summer, prune the first or second week in April in warmer sections of Texas and the first or second week of May or June in cooler areas. The only exception to this rule is pines, which should be pruned before the candle growth develops in the spring.
Prune evergreens according to their growth habits. Allow these plants to assume their natural shape. Pruning is a matter of cutting the branches so that a more desirable plant is attained through compact, controlled growth. This requires pruning individual stems rather than shearing. Shearing not only ruins the natural growth habit but prevents light from penetrating into the center of the plant resulting in foliage drop.
There are certain rules to follow for various types of narrow-leaved evergreens. Start pruning when evergreens are small, usually the first year after they come from the nursery. Then, if they are pruned a little each year, severe pruning is not necessary. Remove dead branches whenever they occur. New foliage from surrounding branches will fill in these gaps. The spreading forms of junipers should have the tip ends of their growth trimmed each year. This holds the plants in check and induces a compact growth habit. An example of a vigorous-growing, spreading evergreen is pfitzer juniper. It is common for this plant to grow 12 to 18 inches or more each year. To maintain the natural shape of this plant, it is necessary to cut back to growing points. It also may be necessary to cut back into the previous year’s wood to maintain the plant’s size and shape.
For the narrow-leaved, upright evergreens, such as pines or junipers, little pruning is required. When pruning any narrow-leaved evergreen do not cut into bare wood behind the foliage on the tips. Since few adventitious buds are formed on older twigs, the plants may be damaged beyond repair. Do not cut the central leader of these plants except to remove a multiple leader. This may occur when the plants are young. Remove all but one of the stems, leaving the straightest and strongest. When pines are young and growing vigorously, the top growing point may outdistance the rest of the plant, resulting in an open space between the main body of the plant and the growing tip. To encourage the plant to branch and be more compact, cut the top back to a dormant bud located near the main body of the plant. If this cutting back is done when the plants are young, there is little effect on plant appearance. It is better to select a compact or dwarf form of narrow-leaved evergreen than to do a lot of pruning. Many narrow-leaved evergreens will have much of the inner foliage turn brown in the fall, which is the natural pruning process. The amount of browning may vary considerably from season to season. This is a natural shedding of older leaves and is comparable to the dropping of leaves by deciduous plants. This occurs principally on cypress and some pines. Extensive periods of hot, dry weather also contributes to the loss of leaves on narrow-leaved evergreens.
Pruning Broad-Leaved Evergreens
Broad-leaved evergreens such as gardenias, camellias, azaleas, pyracantha, hollies and photenias require very little pruning. Lightly thin broad-leaved evergreens grown for their showy fruit such as pyracantha and holly during the dormant season if needed for shaping. Remove old or weak stems. This group can go several years without pruning except for some slight cosmetic pruning to keep them neat. If too much wood is removed from these plants at anytime, summer or winter, the amount of fruit is reduced the following season. When these plants become old and misshaped, cut them back 6 to 8 inches from the ground before spring growth begins. Don’t cut them back too early, however, because a flush of growth could freeze and set them back. Prune only after the danger of the last killing frost is past. Such pruning stimulates the growth of new shoots from the base of the plant. Many gardeners prefer to remove only about one-third of the branches at one time and retain the general shape of the plant. This method also can be used. In the long run, probably the best thing to do with overgrown broad-leaved evergreens is to maybe remove and replace them.
Pruning Hedges
Hedges are a row of plants that merge into a solid linear mass. They have served gardeners for centuries as screens, fences, walls and edging.
A well-shaped hedge is no accident. It must be trained from the beginning. Establishing a deciduous hedge begins with selection of nursery stock. Choose young trees or shrubs 1 to 2 feet high, preferably multiple-stemmed. When planting, cut the plants back to 6 or 8 inches; this induces low branching. Late in the first season or before bud-break in the next season, prune off half of the new growth. The following year, again trim off half.
In the third year, start shaping. Trim to the desired shape before the hedge grows to its desired size. Never allow plants to grow untrimmed to the final height before shearing; by that time, it is too late to get maximum branching at the base. Do not allow lower branches to be shaded out. After the hedge has reached the desired dimensions, trim closely in order to keep the hedge within chosen bounds.
Evergreen nursery stock for hedging need not be as small as deciduous material and should not be cut back when planted. Trim lightly after a year or two. Start shaping as the individual plants merge into a continuous hedge. Do not trim too closely because many needle-bearing evergreens do not easily generate new growth from old wood.
Hedges are often shaped with flat tops and vertical sides; however, this unnatural shape is seldom successful. As far as the plant is concerned, the best shape is a natural form, with a rounded or slightly pointed top and with sides slanting to a wide base (Figure 10).
After plants have been initially pruned to include low branching, maintain by trimming the top narrower than the bottom so that sunlight can reach all of the plant leaves (Figure 11).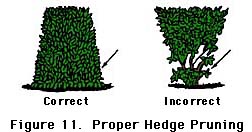
These questions often arise: How often should a hedge be trimmed? When should I trim? Answers depend to some extent on how formal an appearance is desired. In general, trim before the growth exceeds 1 foot. Hedges of slow-growing plants such as boxwood need to be trimmed sooner. Excessive untrimmed growth will kill lower leaves and will also pull the hedge out of shape. Trimming frequency depends on the kind of shrub, the season and desired neatness.
What can be done with a large, overgrown, bare-bottomed and misshapen hedge? If it is deciduous, the answer is fairly simple. In spring before leaves appear, prune to 1 foot below desired height. Then carefully trim for the next few years to give it the desired shape and fullness. Occasionally, hedge plants may have declined too much to recover from this treatment, making it necessary to replace them.
Rejuvenating narrow-leaved evergreen hedges is more difficult. As a rule, these evergreens cannot stand the severe pruning described above. Arborvitae and yew are exceptions. Other narrow-leaved evergreen hedges may have to be replaced.
Rejuvenating broad-leaved evergreen hedges is possible by pruning the hedge back from one-half to one-third of hte hedge height just before spring growth begins. Light follow-up pruning can be done as the growing season progresses to insure the shabe and density of the hedge.
Tools
What tools should be used to trim hedges? The traditional pair of scissor-action hedge shears is still the best all-round tool. It cuts much better and closer than electric trimmers which often break and tear twigs. Hand shears can be used on any type of hedge, while electric trimmers do poorly on large-leaved and wiry-twigged varieties, and sometimes jam on thick twigs. Hand shears are also quieter, safer and less likely to gouge the hedge or harm the operator.
Hand pruners are useful in removing a few stray branches and are essential if an informal look is desired. Large, individual branches can be removed with loppers or a pruning saw.
Pruning Vines, Groundcovers
The type and severity of pruning vary with the different uses of vines. Vines left unpruned for many years generally become unattractive. They may harbor wasps and rodents, experience foliage and twig dieback, and lose their landscape effectiveness. Vines usually cover an arbor or wall. Used in these ways, they are easily pruned to give a clean, well-kept appearance for displaying foliage, flowers or fruit. Some vines, such as honeysuckle and grape, grow so fast and thick that considerable pruning may be necessary while other species need little pruning. Prune most vines in Texas during the dormant season from February to May. Prune dead, diseased or damaged vines back to healthy wood. Cut interfering and crossing branches of woody vines such as trumpet creepers or wisteria back below the point of interference or at the junction with the main stem. Prune out the top one-third of overgrown or elongated stems. Prune old mature stems that are declining in vigor by one-third or more.
Each year, prune stems of trumpet creepers and wisteria to promote new growth and flowers. Prune back the top of the plant to force out new branches. Give special attention to wisteria because considerable confusion exists about pruning and flowering. Pruning wisteria extensively during dormant season encourages rampant vegetative growth the next spring. Instead, in July prune out the long, straggly growth leaving those branches needed for climbing. This is more likely to induce flowering than anything else. Cut shoots back one-third to one-half their length, which causes the production of short spurs upon which next season’s flower clusters are borne. Wisterias bloom abundantly if planted in well-drained soil and full sun, watered well the first growing season and pruned in the summer.
Espalier plants are trained in patterns on a flat surface such as a fence or wall. With proper care, plants can be trained into almost any desired plant. Unless you are willing to maintain such training indefinitely, it is best not to develop such a plant. Usually, it’s easier to start with a trained plant purchased from a nursery. If a trained plant is not available, use a 1-year old plant. Most espaliers require pruning throughout the growing season to maintain the desired shape. In most cases, it’s better to have some type of a guide or wire on the wall to encourage the plant to move in that direction.
Pruning groundcovers is necessary only to remove unhealthy tissue or to promote spreading. Vigorous groundcovers include honeysuckle, winter creeper, Asian jasmine,Vinca minor, Vinca major and English ivy. These groundcovers may be mowed with a rotary lawn mower or cut back to 4 to 6 inches in height every few years to keep them vigorous, neat and well manicured. The best time to do this is in the early spring after danger of frost has passed but before the new growth starts.
Pruning Roses
Rose plants need pruning to tidy up their appearance; control size; and improve their vigor, growing habits and bloom. Pruning methods vary according to the type of rose plant. In South and Central Texas, roses usually are cut back more severely than in North Texas. This is due to the longer growing season, resulting in larger bushes. To keep them in bounds, spring pruning usually is more drastic. Prune about 3 to 4 weeks before the average date of the last killing frost in your area. Roses have a very low chilling requirement to break dormancy. A few weeks of cold weather in December fulfills this requirement and new growth begins the first warm spell in January or February. If pruning is done too early, the new growth begins at the base of the plant. A sudden cold spell in late February or early March can severely damage or kill the plant. If pruning is delayed, the new growth will still be in the top of the unpruned canes and only upper portions of the bush will be damaged in a late freeze. An exception to this rule involves climbing roses which need to be pruned after flowering in early spring.
Probably no other aspect of growing roses has aroused as many questions as has the subject of when and how to prune roses. By following a few simple rules you can improve their appearance and vigor and control the quality and quantity of the flowers. Pruning roses dates back to the nineteenth century when rose growers began to severely prune their plants to produce larger blooms for show. Unfortunately, plant longevity was of secondary importance to these exhibitors. Some fundamental practices of pruning roses correctly in all gardens, regardless of type, are: 1) remove any canes that have been damaged by insects, diseases or storms; 2) remove one of two canes which may be rubbing one another; or 3) remove canes that are spindly or smaller in diameter than the size of a pencil. After pruning, according to these general recommendations, cut hybrid teas, florabundas, and grandifloras back to 12 inches for large flowers and 18 to 24 inches for many smaller sized flowers.
Climbing roses generally are pruned to renew plant vigor by removing the old canes since the most productive and finest blooms on climbers are produced on canes that arise from the bottom of the plant the previous year. These newer canes produce more desirable growth and flowers. Since the canes may become quite long, it is necessary to prune them back so they are maintained in the desirable area.
Old-fashioned or antique roses require much less pruning than modern roses. Left unpruned old fashion roses will naturally obtain a rounded shrub shape. Pruning of these roses should be confined to some shaping of the plant, removal of damaged branches, and judicious trimming back to encourage growth.
On all roses, consider the cutting of the flowers as a form of pruning. When gathering rose blooms, always leave at least two sets of leaves on the branch from which you cut the flower to insure plant vigor. When removing faded, spent flowers, cut only as far as the first five-leaflet leaf. When making cuts on the ends of branches, cut at 45 degree angles above an outside bud one-half inch above the bud with the lowest point on the side opposite the bud, but not below the bud itself. When removing branches, never leave stubs since these die and can cause problems on the plant later. Always remove branches by cutting to a lateral branch or bud, or back to the base of the rose plant.
The information given herein is for educational purposes only. Reference to commercial products or trade names is made with the understanding that no discrimination is intended and no endorsement by the Texas AgriLife Extension Service is implied.
Educational programs of the Texas AgriLife Extension Service are open to all people without regard to race, color, sex, disability, religion, age, or national origin.
Publication Revised November 2008

